Found a mouse or rat in your food storage? It is frustrating as these little pests can carry diseases. Unfortunately, dry storage areas are the perfect hiding spots for them. If left alone, they can quickly cause a big mess. Well, there are many simple and humane DIY mouse trap ideas at home. You can catch them with a quick solution without harm. In this guide, we’ll share an easy homemade mouse trap idea, which is safe and cost-effective. Let’s deal with unwanted rodent guests!
Step-by-Step Guide to Making Your Own Mouse Traps
You can build effective traps at home using everyday items. There are many options that can catch multiple mice before you ever have to check it. We’ll start by showing you how to make a repeating bucket mousetrap. From there, you can move on to other simple trap styles to suit your needs.
Materials Needed
To assemble this efficient, no-kill trap, you only need everyday items you might already have at home.
- Clean 5-gallon plastic bucket (leftover paint or laundry detergent buckets work well),
- Sturdy paper or Styrofoam plate
- Length of wire coat hanger you can straighten out.
- Two small sticks or boards to serve as ramps
- Dollop of peanut butter for bait
- Water.
- Drill (or a sharp awl) to make small holes
Gathering these through-and-through materials before you begin will keep the process smooth and quick.
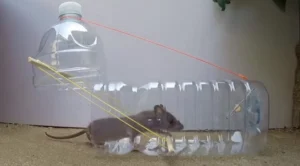
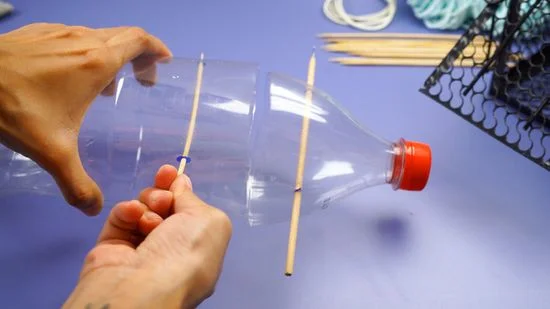
Preparing the Bucket
Start the process by preparing the bucket. Drill two tiny holes directly opposite each other, just beneath the top lip of the bucket and about halfway across its opening. These holes form the axle points for your spinning plate. Make sure the holes are just large enough to snugly hold your coat-hanger wire without wobbling. Once drilled, rinse the bucket thoroughly to remove any residue, then dry it so moisture won’t reduce your wire’s grip.
Installing the Coat Hanger Axle and Plate
Straighten your coat hanger and cut a 12–15-inch section for the axle. Slide one end of the wire through one of the drilled holes. Thread it under the plate about an inch from the edge. Then push it back through the opposite side of the plate before guiding it out the second hole. The plate should now spin freely on this wire axle, balanced over the bucket’s opening like a miniature seesaw.
Setting Up Ramps and Water Barrier
Pour two to three inches of fresh water into the bucket to prevent any caught mouse from climbing back out. On both sides of the bucket, lean your sticks or boards at a gentle angle so mice can easily scamper up to the “high dive.” The ramps must provide a solid, non-slippery path from the ground to the plate’s edge.
Baiting the Trap for Self-Resetting Action
Using just enough peanut butter, lightly coat the edge of the plate that overhangs the bucket. Flip the plate over and repeat on the other side near the same spot. Avoid piling on too much bait, or the plate will tip prematurely.
The goal is to balance the plate until a mouse steps past the coat-hanger axle, at which point a slight shift will send the mouse spinning into the water below. After each drop, the plate flips back into its original position—still baited and ready for the next visitor.
Operation and Maintenance
Place your trap in the barn, feed shed, or wherever you’ve noticed mouse activity. Warm weather may require checking the bucket once a week, while cooler months can stretch to once a month. When it’s time to service your trap, simply empty the bucket, discard any water and mice responsibly, refill with fresh water, and re-bait the plate. This repeating design cuts down on daily resets, giving you reliable mouse control with minimal effort.
Common Mistakes to Avoid When Setting Mouse Traps
Setting mouse traps seems straightforward: you bait, set, and wait. But a few simple errors can slow you down and let mice slip away. Read on to learn seven common mistakes and the easy fixes that will help you catch mice faster and more reliably.
Ruining the Bait
When you handle traps or bait with bare fingers, you transfer your scent, and mice will often avoid anything that smells like you. Always put on clean gloves—like those for dishes or yard work—before touching traps or bait. This keeps your smell away and makes your trap look “safe” to a curious mouse.
Using Too Much Bait
A mountain of bait lets mice nibble around the edges without ever triggering the trap. Stick to a pea-sized dab of peanut butter or spread—just enough to tempt them but not enough to let them get away without setting off the mechanism.
Expecting Instant Results
Mice are naturally cautious around anything new. Leave your traps unset but baited for two or three days so the mice learn they’re safe to eat from. Once you see bait disappearing, you know they’ve accepted the trap’s presence. That’s your cue to arm the traps for a much quicker catch.
Placing Traps in the Wrong Spot
Mice hug walls and dark corners—they rarely dash across open floor space. Position traps flush against walls with the trigger end facing the wall. Tuck them behind cabinets, along baseboards, or near holes you’ve spotted. This puts the bait directly in their path.
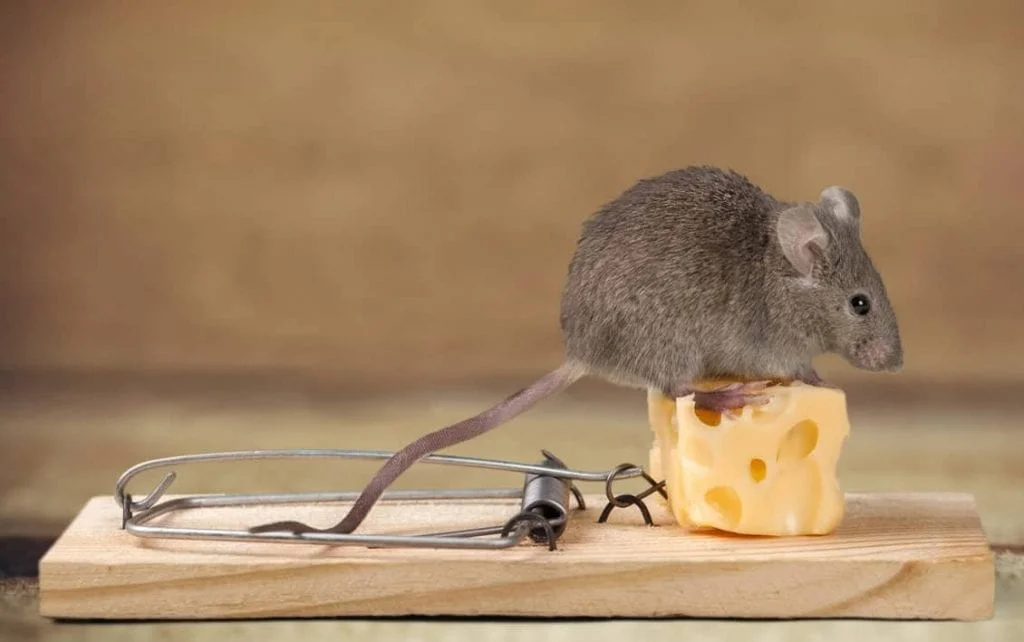
Using the Wrong Food
Forget cheese as your go-to bait. Wild mice prefer high-fat, high-protein snacks like peanut butter or hazelnut spread. Chocolate can work too. In colder months, they also gather soft materials for nesting—cotton balls, yarn, or even dental floss can draw them in. Attach these fibers around the trigger on snap traps so the mouse must pull or chew to get the bait, springing the trap every time.
Not Using Enough Traps
Mice breed rapidly, so you’re almost certainly dealing with more than one. To hit your whole infestation fast, space traps every 2–3 feet along active walls. In high-traffic zones, set two traps side by side, just an inch apart. You’ll catch more mice in less time.
Starting Slow
Most mice you’ll catch happen on your first night of trapping. Don’t limit yourself to one or two traps—go all in from the start. Place traps wherever you’ve seen droppings, chew marks, or runs. Use a variety of baits and trap types to make that opening night your most productive one.
Conclusion
At last, you can protect your pantry and storage areas from mice or rats without harmful chemicals or expensive gear. You can simply set up the traps at home without worrying about more time and expense. Enjoy a clean, rodent-free space using this method. Give it a try, and reclaim your home from unwanted guests once and for all!
FAQs:
Mice tend to show strong attraction to foods with high calories along with sweetness and fat content.
1. Peanut Butter: Sticky and high in calories, it’s the top choice.
2. Sunflower Seeds: Crush them slightly to release scent.
3. Chocolate or Candy: Perfect for munching mice with a sweet tooth.
· Soft cheese and marshmallows also work well.
Follow the steps:
1. Use a live-capture trap
2. Bait it with peanut butter or peanut butter
3. Soaked cotton balls.
4. Wait for the rat to enter, and the door snaps shut behind it.
Then you can release the rat safely in a field or wooded area several miles from your home.
Regular checks keep bait fresh and ensure any caught rodents are released promptly.
1. Warm months: Check every 3–7 days.
2. Cold months: You can stretch to once every 2–4 weeks.